Lulu and Phoebe's Gluten Free Chocolate Chunk Cookies
Got Celiac? Not a problem.
Lulu and Phoebe (and the typist) are looking forward to eating their way through the holidays and thought it might be fun to offer up some tasty, sweet treats that are all gluten free. We’ve been perfecting these things for about 5 years and we feel confident enough to share them with everyone.
Let us begin with the mama of all cookies, the delicious chocolate chunk cookie. The criteria for this cookie are simple. The cookie must be a tasty medium to hold together tons of warm gooey chocolate. The best quality chocolate you can find, that is. To do this, we experimented and saved you all the trouble of testing the ingredients, particularly the chocolate. But if you are like me, you might have to taste test to convince yourself of my choice.

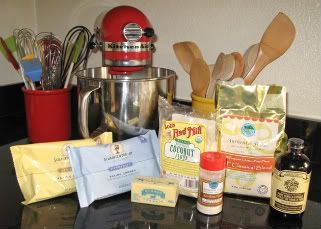
Gather the ingredients
There is not a speck of taste to waste in these recipes and so each and every little ingredient must be perfection. Gluten free does not have to mean taste free! So spend a little up front, and be prepared to be dazzled with your creation. A little bit goes a long way so while you spend more initially, you will be able to use less and it will last longer. Everything except the chocolate, that is.
You will need some excellent gluten free flour. To do that I have saved you years of torture! There are some doozies out there. Rice flours that are more like ingredients for a sand box, or mixes full of things like ground beans, tapioca, or moss tree bark, that taste, well, like moss tree. Yes, I made that up to make a point. The very best flour mix I have found thus far is from Authentic Foods, called the classic blend with a bit of rice flour, potato flour, and tapioca starch. It is smooth, not gritty, and is a simple 1/1 substitute for regular flour. They also have a sweet rice flour (not sweet tasting) that I use as well.
Next up, when baking, gluten free flours need some assistance. It took me a while to dig this one up, but for the past year, I always use Bob’s Red Mill Coconut Flour as 1/3 of the total flour called for in a baking recipe. It provides a wonderful note to the final product and while it smells like coconut going in, it does not overwhelm the final product. It gives it an added dimension that adds complexity.
And the last lesson in gluten free baking – always always always add a tiny bit of xanthan gum (the little red container in the photo) to the flour mix. This little bit of magic adds back a gluten-like texture that will be missing if you leave it out. And if you leave it out, your cookies will crumble. Literally. Guaranteed!
European butter is your friend. Never use anything less than the best and make sure it is unsalted. You can add in salt, but you can’t remove it. Make sure it is at room temperature first. If you know you are baking that day, just toss a brick on the counter in the morning when you get your coffee.
Use the very best vanilla you can find. I buy mine at Williams Sonoma because they have the best price. Sometimes it pays to shop around.
And let us not forget the main ingredient, the star of this show. Chocolate chunks. Until recently I used Whole Foods (blue bag) chocolate chips. But recently showing up on the shelves was Scharffenberger bittersweet and semisweet chocolate chunks and I fell in love. They are ridiculously expensive, except when on sale, so if you catch a sale, buy up. They last. And the flavor is unbeatable. The whole foods chips are rated highly as well and have a terrific flavor –not too sweet, but the Scharffenberger is better.
Equipment
I love my Kitchen Aid stand mixer and I use it a lot and it has lasted for years. They are worth the money, but you can still make the recipe with a hand mixer and even with a wooden spoon. But every time I walk in the kitchen and see my red mixer, I smile.
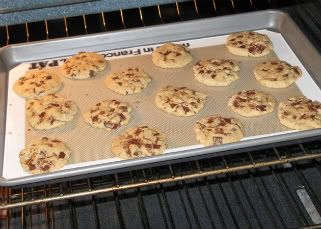
I like good cookie sheets, not too dark, not too light, and the right weight. It matters actually because the kind of sheet you use will alter the outcome of the cookie and the baking time. And don’t forget the parchment or the silpats. I bought silpats five or six years ago and they are still working just fine. You never have to worry about hurrying back to get the cookies off the sheet before they stick. They never stick with a silpat. You can see the silpat in the photo.
Lulu and Phoebe’s
Gluten-Free Chocolate Chunk Cookie Recipe 2008
Makes about 52 3” cookies or fewer larger cookies
½ cup of Bob’s Red Mill Coconut Flour
1.5 cups of classic blend or sweet rice flour (Authentic Brands)
¾ teaspoon baking soda
½ teaspoon salt (or less)
¾ teaspoon xanthan gum
1 cup (2 sticks) best unsalted butter you can find – softened
1 cup light brown sugar
½ cup white sugar
2 large eggs
2 teaspoons pure vanilla extract
2 teaspoons Godiva liquor (or your favorite chocolate liquor)
3.5 cups of chocolate chunks or chips (Scharffenberger)
Optional: 1 cup of toasted chopped nuts (pecans, walnuts or your favorite)
1. Preheat oven to 350. Make sure racks are in the center of the oven. Line two baking sheets with parchment or silpats.
2. Measure the flours, baking soda, xanthan gum, and salt into a bowl. Use whisk to stir them together to both lighten them up and to incorporate it all together.
Gluten Free Note: While other recipes would want you to sift the flour, I find sifting GF flour silly. It isn’t the same. Just use a whisk to incorporate all the dry stuff together and that will lighten it a bit. At the same time, you are whisking out any lumps in the GF flours.
3. In the mixer stand bowl, using the paddle attachment, or a large bowl using a hand mixer, beat the butter and sugars together until very light and fluffy. It takes a few minutes so be patient and scrape down the sides of the bowl often. It will be fluffy enough when it changes to a nice pale color and looks like you want to stick your finger in there thinking it is frosting….
4. To that add each egg, one at a time until incorporated. Then add the vanilla and Godiva liquor until blended.
5. Add the dry stuff a little at a time on low speed just until well mixed. To that, add the chocolate chunks/chips and give it one more turn and stop. You don’t want to break up the chocolate chunks too much. Use a big spatula or wooden spoon to finish incorporating the chocolate. Add the nuts here if you are using them.
Gluten Free Note: when using regular gluten flours you always want to mix just until it is incorporated otherwise the cookie can be tough. With GF flours there isn’t that danger, but still, never good to over-mix.
6. I use a handy small ice cream scoop, or you can use two spoons (one to scoop the other to scrape off the scoop) to gather about a large tablespoon of the dough into a ball and pop onto the prepared cookie sheets about 2 inches-ish apart. This is where you have to use your judgment after a little practice. You will know the spacing that works for your cookies after the first batch. Sometimes I can put more on the cookie sheet, or less on the cookie sheet depending upon how large I want the cookie to be.
7. Once they are placed on the cookie sheet, you want to keep your fingers wet and flatten them as skinny as you can make them. This is because they will not spread as much as an ordinary cookie made with flour would. GF needs some assistance. Trust me. You can see from my cookie sheet that they are very thin and I get them that way by gently smashing them flat with my fingers after placing the scooped up balls on the cookie sheet. I leave a little room for expansion, but you don’t need much.
When you are happy with their presentation, pop two sheets into the oven and time it for about 8 minutes. At eight minutes, reverse the cookie sheets so the bottom one is now the top one and the back is the front. That way they bake evenly.
8. At 11-13 minutes you have cookies! Watch them carefully. They bake up quickly when they are finishing. For crispier cookies leave them in a bit longer. For chewy cookies, take them out a bit early. They should look like this photo for chewy cookies. These are about 12 minute cookies.
Gluten Free Note: GF flours don’t brown like regular flour. If you wait for the “golden brown” look you will be inviting the firemen in for coffee. So watch them carefully. The addition of coconut flour helps because it actually can turn color, thus these cookies look brown when finished. Just saying. And it took nearly five years to figure that out.
9. Let them cool on the cookie sheet for about 4-5 minutes and remove them to a rack to finish cooling. If you place them immediately on a plate they will get soggy. A rack is important. Especially if you want crispy cookies.
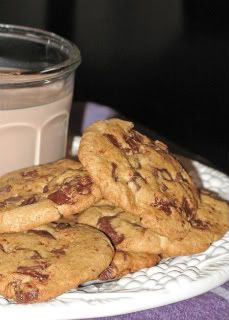
And don’t forget to eat some while they are warm. With chocolate milk.


No comments:
Post a Comment